JDBC tutorial: Easy installation and setup with Apache Derby
Prior to the release of Java 9, Apache Derby was distributed along with the JDK and named JavaDB. As a result, it was common for developers interested in Java database connectivity (JDBC) to learn on Derby.
Derby is a relational database written entirely in Java, and, while it is no longer packaged with the JDK, it is easy to download and install. It's still a great database option for developers who want to learn about JDBC.
In this JDBC tutorial, we will install Apache Derby and use the Derby command window to create a database named "RPSDB" and a table named "Game." The Game table will be used to keep track of rock-paper-scissors games played in a hypothetical online tournament.
After the database is set up, we will write a Java program that uses JDBC to connect to the RPSDB database, insert data in the Game table and then query the contents of the table.
Note that this JDBC tutorial assumes a JDK is installed and the JAVA_HOME system variable is configured.
Install and configure Apache Derby
The Derby database can be downloaded from the Apache website. It's only about 20 MB in size and installation is straightforward. In this tutorial, the file is unzipped in the C:\_tools directory, and the unzipped folder is renamed derby10.
C:\_tools\derby10
Apache Derby comes with a command line utility named iv.bat, which can be found in Derby's \bin folder. Use a command prompt or BASH shell and run the iv.bat command.
C:\_tools\derby10\bin\iv.bat
Create Derby database and tables
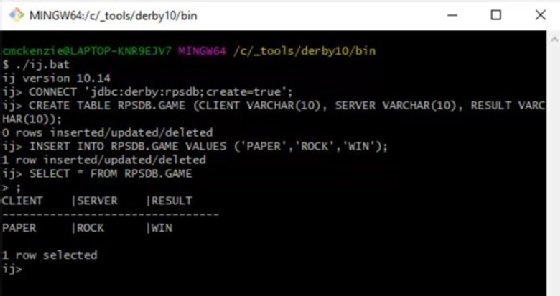
At the command line that appears, run these commands one at a time to create the RPSDB database, create the Game table, insert a record into the Game table and to query the Game table's contents.
CONNECT 'jdbc:derby:rpsdb;create=true';
CREATE TABLE RPSDB.GAME (CLIENT VARCHAR(10), SERVER VARCHAR(10), RESULT VARCHAR(10));
INSERT INTO RPSDB.GAME VALUES ('PAPER','ROCK','WIN');
SELECT * FROM RPSDB.GAME;

JDBC programming with Derby
Now that the database and table have been created, it's time to move into the world of JDBC. For this example, I used the Eclipse-based SpringSource Tool suite, although any development environment will suffice. Create a class -- I named it DerbyExample -- that will import all classes in the java.sql package and have a main method that includes a throws Exception clause.
package com.mcnz.jdbc.introduction;
import java.sql.*;
public class DerbyExample {
   public static void main(String[] args) throws Exception {
      Class.forName("org.apache.derby.jdbc.ClientDriver");
   }
}
Make sure the throws Exception clause is included in the main method declaration. Many of the objects in the Java SQL package throw exceptions and you'll add unnecessary verbosity to your code if you don't catch them. The throws Exception clause will greatly simplify the code we need to write.
Load Derby database drivers
You will notice the first line uses the static Class.forName method to load Derby's ClientDriver. This is the JDBC driver needed to marshal calls back and forth between our Java program and the database. That class is not currently on the classpath, which means if you run the code now it will generate a ClassNotFoundException.
The ClientDriver class is included as part of the Apache Derby download. It's in a file named derbyclient.jar, which can be found in Derby's \lib directory. Add this class to the Java classpath and run the DerbyExample class again. The ClassNotFoundException will no longer generate once the derbyclient.jar file is successfully added to the classpath.
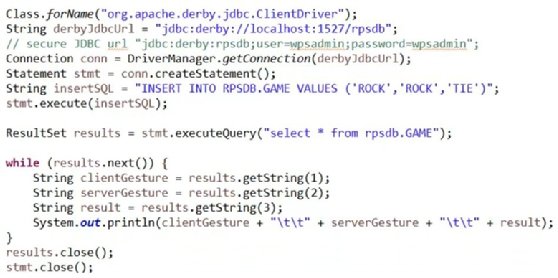
The ClientDriver can be resolved at runtime, and you can use the JDBC API to connect to the database and add a record using SQL and the Statement object. Furthermore, the ResultSet class can be used to query the database. The full code for this Derby example is as follows:

Compile and run the Derby JDBC tutorial example
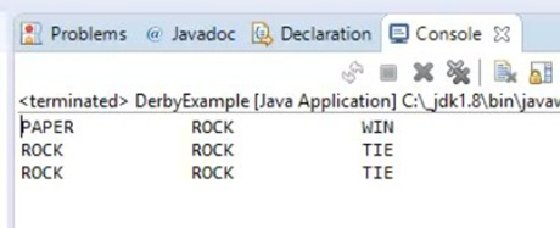
When the DerbyExample class is compiled and run, it first adds a record to the database, then queries the database and outputs the result. After two runs of the code, the output looks as follows:

That's all you need for this JDBC tutorial about how to use Java to connect to a database and perform JDBC programming with Apache Derby.


