Install the Jenkins Artifactory plugin in 5 easy steps
When people muse about CD, they often envision an application deployed directly into production. But that type of operation is the exception, not the norm.
More often than not, CD involves a successful Jenkins pipeline that pushes an artifact, such as a JAR file or Docker image, to a repository, like JFrog Artifactory or Sonatype Nexus. In this Jenkins Artifactory plugin tutorial, we will demonstrate how easy it is to integrate these two popular DevOps tools.
To integrate Jenkins and Artifactory, follow these five steps:
- Install and configure Jenkins.
- Install and configure JFrog Artifactory.
- Install the Jenkins Artifactory plugin through Jenkins' administrative console.
- Configure the Jenkins Artifactory plugin through the Jenkins System Setting page.
- New Jenkins build jobs indicate whether a Jenkins upload to Artifactory should occur.
For this Jenkins Artifactory tutorial, let's assume that both Artifactory and Jenkins are already installed, and the first step in this tutorial will be to install the Jenkins Artifactory plugin. However, if these two tools are not already installed, follow these tutorials:
- Step 1: Install Jenkins CI.
- Step 2: Install JFrog Artifactory.
Step 3: Install Jenkins Artifactory plugin
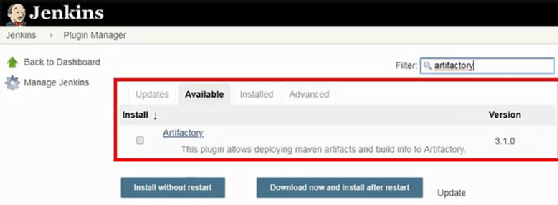
Under the Manage Jenkins page of the administrative console, select Plugin Manager. Then, under the Available tab, search for the Jenkins Artifactory plugin, and choose to install it without a server restart.
Step 4: Integrate Jenkins Artifactory plugin
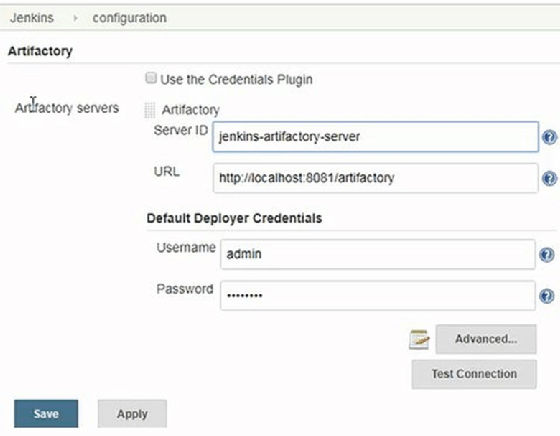
Once successfully installed, inform the Jenkins tool of Artifactory integration by selecting the Configure System page under the Jenkins Management section of the administrative console.
The configuration page requires the administrator to provide a name for the Artifactory server, the connection URL and credentials to provide the rights required for an authenticated Jenkins upload to Artifactory. For example:
Server ID: jenkins-artifactory-server
URL: http://localhost:8081/artifactory
Username: admin
Password: password
Note that a standard installation of JFrog Artifactory runs on port 8081.
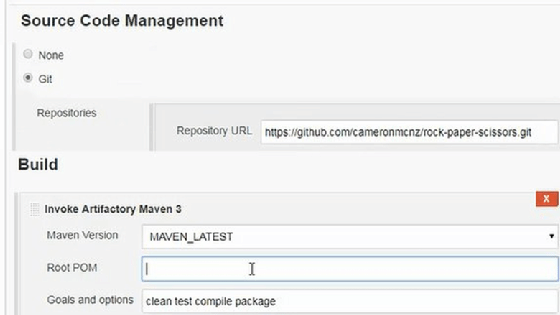
Once the Jenkins Artifactory plugin is installed and configured, the next step is to create a new Jenkins job that uses the plugin. For this example, we will create a new Jenkins freestyle project named jenkins-artifactory-integration that pulls from this GitHub repository.
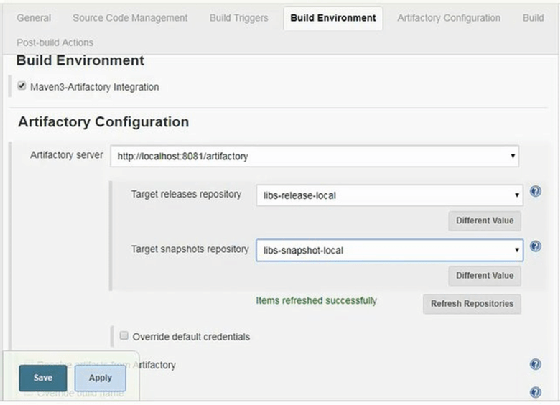
In the Build Environment section of the freestyle project, enable the Maven3-Artifactory Integration checkbox. In the input form that appears, provide these settings:
Artifactory server: http://localhost:8081/artifactory
Target releases repository: libs-release-local
Target snapshot repository: libs-snapshot-local
Step 5: Use the Artifactory Jenkins plugin in a build job
The last step to create the freestyle project is to choose the Invoke Artifactory Maven 3 build step, provide the values clean test compile package for the Goals and options text field, save the changes and run the build job.
Automatic Jenkins upload to Artifactory
When the build job runs, an artifact in the form of a JAR file will be created, and Jenkins uploads it to Artifactory with the Jenkins Artifactory plugin. To validate the successful upload, simply open the JFrog Artifactory administrative console, and inspect the libs-snapshot-local Maven repository. A new folder named com/mcnz/rps/roshambo/1.0-SNAPSHOT will contain a timestamped file named roshambo-1.0-timestamp.jar.
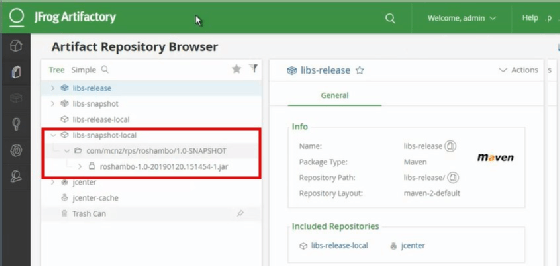
The plugin architecture Jenkins provides makes it simple for third-party tools to integrate seamlessly into the CI/CD tool. With the Jenkins Artifactory plugin, uploading JAR files to JFrog's popular Maven repository at the conclusion of a build job is a relatively straightforward endeavor.


