4 ways to upload a JAR to a JFrog Artifactory repository
If you're a software developer with POM files at the root of your project, you know a thing or two about obtaining files from a Maven repository.
It's easy to pull from Maven central or the in-house artifact repo. To go the other direction and push JAR and zip files to a Nexus or Artifactory repository is a less trivial endeavor. But it doesn't have to be that difficult. Here are four different ways to push JAR files to a JFrog Artifactory repository.
1. Upload to the Artifactory repository manually
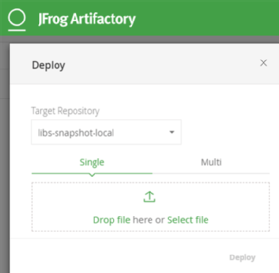
The easiest way, and the least DevOps-friendly way, to upload a JAR to an Artifactory repository is to simply log in to the administrative console, select a target folder and drag and drop the JAR onto the deployment screen. It's not a process that lends itself to CI and automated deployment, but it works.
The manual upload is also a great way to verify that a recently configured Artifactory installation is working properly. If there are problems uploading an artifact using the drag-and-drop features of the administrative console, you might want to get those ironed out before attempting any of the other upload options mentioned here.

2. RESTful API Artifactory deployments
To upload large files to an Artifactory repository, you might find yourself forced to make a RESTful API call. Like most RESTful APIs, the Artifactory RESTful API syntax is relatively straightforward, and it can be easily kicked off by issuing a curl command. This makes it relatively simple to integrate JAR deployment with a Maven repository through a shell script or a batch command.
Here's the basic syntax for a RESTful Artifactory repository JAR upload using curl and the RESTful API. The curl command all goes on a single line.
$ curl -X PUT -u u:p -T Maven-Upload-1.1.jar "http://localhost:8081/artifactory/libs-release-local/Maven-Upload-1.1.jar"
3. Deploy the Maven Artifactory plugin
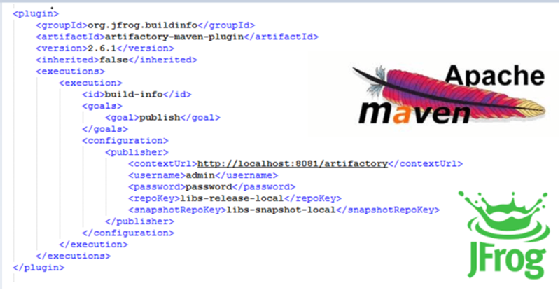
There's a Maven Artifactory plugin that will connect to the Artifactory repository as part of a successful build. Simply issue a Maven deploy command as part of the build, and if the Maven plugin is configured correctly, the artifact it produces will be uploaded.
To use the Maven Artifactory plugin, the pom.xml file will need to point to the Bintray plugin repository:
<pluginRepositories>
  <pluginRepository>
    <id>Maven-Artifactory-Plugin</id>
    <url>https://jcenter.bintray.com</url>
  </pluginRepository>
</pluginRepositories>
With a reference to the Bintray repository configured, an element needs to be added to the pom.xml file referencing the Artifactory Maven plugin. This includes a link to the target repo.

4. Continuous Jenkins Artifactory integration
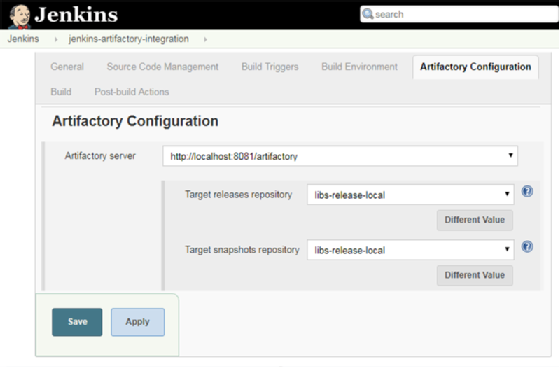
For organizations in pursuit of DevOps enlightenment, it's the CI/CD build that should be pushing packaged artifacts to an Artifactory repository. Fortunately, JFrog provides a Jenkins Artifactory plugin that facilitates automation of the process. Simply install the Jenkins Artifactory plugin, configure the Artifactory repository within the Jenkins tool and then include deployment to the Artifactory repository as one of the Jenkins build steps.

A Maven repository is often the final destination for a development artifact after it has been compiled, tested and subjected to quality control. When the time arrives to upload a resource to an Artifactory repository, as you can see, there are plenty of options to complete that task.
DevOps pipelines with Artifactory
Moving a JAR file into a Maven repository is one of the last steps in a CD pipeline. Follow these resources for more information on assembling a CI/CD pipeline:
Why you need a Maven repository
How to set up and configure Artifactory or Nexus
How to build apps with Jenkins CI
Integrate Jenkins with Git and GitHub


