
chajamp - stock.adobe.com
How to setup a local Maven repository server for artifact hosting
This article looks at how to setup a local Maven repository, along with the functionality a local Maven repository server should provide. Criteria for choosing a private, local Maven repository are listed, along with Maven tutorials on how to setup Artifactory and Nexus.
Maven is an extremely popular Java build tool for a variety of reasons. As such, it is no wonder that developers and organizations are looking at setting up local Maven repositories to compliment the remote ones that are publicly accessible. The Maven repository is an important tool for any organization interested in having a successful DevOps transition.
One of the benefits of Maven is that it helps to reduce the duplication of dependent software libraries and JAR files required to build a Java application. The Maven approach to artifact management is to store all built software libraries in an area of storage called a repository. Commonly used frameworks like Spring Boot and popular add-ons such as the Docker plugin, Kubernetes utilities and continuous code quality tools such as Checkstyle are hosted in public repos. For private and secure artifact management, organizations need to setup a local Maven repository such as JFrog's Artifactory or Sonatype Nexus to compliment the public repo.
One of the reasons organizations will setup a local Maven repository is because a public repository can be slow, unreliable and does not always have the latest versions of required JARs and libraries. Libraries private to the organization cannot be uploaded there either. By setting up a local Maven repository server for artifact hosting, an organization can avail itself of the benefits of a local Maven repository and bypass some of the shortcomings of synchronizing with Maven central.
The local Maven repository server
This article looks at some of the functionality that a Maven repository server should provide. Criteria for choosing a Maven repository are listed. Steps involved in how to setup a local Maven repository using the JFrog Artifactory are explained. The process of setting up the local Maven repository is same for both Linux and Windows and the minor differences are highlighted. Examples of Maven POM files which use this repository are shown. The article is illustrated with screenshots to guide the user in setting up a repository. Sample Maven and Artifactory configuration is also shown. A link ton how to setup a local Maven repository with the Nexus Maven repository can be found below.
We have made significant updates to our Maven materials
This tutorial on setting up a local Maven repository was written over 10 years ago, in June of 2007 to be exact, and while the overview of open source Maven repositories remains completely on point, the version of JFrog Artifactory that is installed here is a bit outdated.
Up to date Maven articles, videos and tutorials
For those looking for information on prior versions of JFrog Artifactory, the information below remains pertinent, as does the information on how a local Maven repository works. However, TheServerSide has a variety of updated tutorials on Maven and setting up local Maven repositories such as Artifactory and Nexus that we urge you to take a look at:
- How to setup a JFrog Artifactory private Maven repository
- Getting started with the Sonatype Nexus internal Maven repo
- Why you need to learn Maven and master the POM based build tool
- Maven tutorial: Installation and configuration of the popular build tool
- Battle of the DevOps tools: Jenkins vs Maven
- Using Checkstyle, Jacoco and Sonarqube Maven plugins
1.1 Background knowledge
It is assumed that the reader is familiar with the following concepts and technologies:
- Maven. Here is a tutorial on how to install Maven and use it on the command line for those who are unfamiliar
- The enterprise software deployment model for Java EE apps and microservices (e.g. deploying web applications to Tomcat or embedding Spring Boot microservices in an embedded application server)
- Some XML basics
1.2 Purpose of a local Maven repository server
The purpose of a local Maven repository is to serve as an internal private repository of all software libraries used within an organization. Storing Maven artifacts (jars and poms) in a dedicated Maven repository is preferable to storing them in version control systems such as Git or Subversion for the following reasons:
- Libraries (JARS) are binary files and don’t belong in version control systems which are better at handling text files
- Keeps the version control database small
- Checkouts, updates and other actions on the version control system will be quicker
1.3 Advantages of having an internal private local Maven repository
- Reduced likelihood of version conflicts
- Less manual intervention required for doing a build first time
- A single central reference repository of all dependent software libraries rather than several independent local libraries
- It is quicker to do a clean build when using an internal repository as Maven artifacts are retrieved from a server on the intranet rather than the ibiblio server on the internet
1.4 Types of local Maven repository servers
- Local Maven repository – exists on developers machine and is maintained by the developer. It is in sync with the Maven repositories defined in the ‘settings.xml’ in their ‘~home/.m2’ folder. If no private remote internal repository is setup and listed in the pom.xml file or settings.xml file, then this local repository on developers machine is synchronized with the public Maven repo
- Private remote internal Maven repository – This the repository which we will setup. We will change the Maven pom.xml or settings.xml to use this repository
- Public remote external repository – This is the public external repository. By default, Maven synchronizes with this repository.
2. Overview of a local Maven repository server
2.1 Development environment without a local Maven repository server
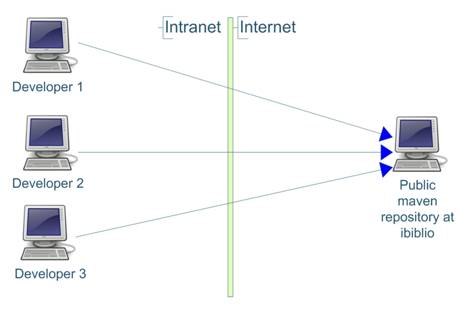
2.2 Development with an organization wide private Maven repository server
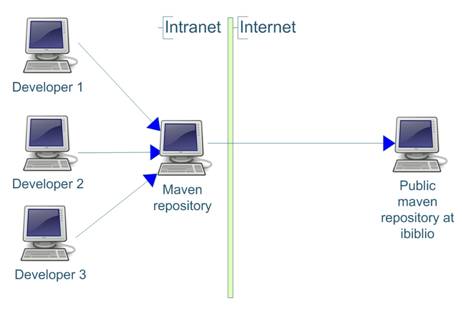
3. Use cases for a local Maven repository server
- Create 2 sub-repositories within the internal repository
- cache for artifacts downloaded and available publicly. This would be synchronized with external repository
- internal-Maven-repository – for organizations internal artifacts. This is not synchronized with any external repository and contains artifacts which are unique to the organization
- Alternatively, another sub-repository can be created for artifacts available publicly but not in the public Maven repo – e.g. later versions of some artifacts. This would not be synchronized with an external repository. We can call this ‘3rd-party’
- Browse remote repository, preferably using a web browser
- Search for artifacts in the repository
- Download code from version control, change ‘settings.xml’ to point to the internal repository and do a clean build without any manual intervention
- Install new version of an artifact
- Bulk import artifacts into the repository
- Bulk export artifacts from the repository
- Backup the repository manually and setup task to do this automatically
4. Criteria for choosing a local Maven repository server
The ideal Maven repository implementation should be:
- Open source Maven repository server software is preferred
- Provide admin tools
- Provide a Maven repository browser – preferably web browser rather than desktop application.
- Deployed in standard web server – e.g Apache or Tomcat
- Ability to create, edit and delete sub repositories
- Bulk import/export facility to move groups of artifacts into and out of the repository
- Access control facility and anonymous read-only access
- Easy to setup and use
- Backup facility
- Issue tracker, forums and other independent sources of information
- Active community/developers so that the produce is enhanced and bugs fixed
5. Comparison of various Maven repository servers
Some of the popular open source Maven repository servers are:
- Sonatype Nexus
- Standard Maven proxy from codehaus
- Dead simple Maven Proxy (DSMP)
- Proximity Maven repository server
- Artifactory
An Artifactory vs Maven vs Proximity comparison is shown below:
| Standard Maven repository | Dead simple Maven Proxy (DSMP) | Proximity | Artifactory | |
| Admin tools | No | Basic | Yes | Yes |
| Repository browser | Basic | No | Yes | Yes |
| Deployable in standard web server (e.g. Tomcat or Jetty) | Yes, but not configurable | No | Yes | Yes(works in Tomcat and bundled with Jetty) |
| Create, edit and delete sub repositories | Yes | Yes | Yes | Yes |
| Bulk import/export artifacts | No | No | No | Yes |
| Easy to setup and use | Yes | No, build from source | Yes | Yes(Ajax web UI) |
| Backup facility | No | No | No | Yes(using Java quartz API and ‘cron’ expressions) |
| Issue tracker, forums and other sources of information | Jira, IRC | No | Wiki and issues tracker | Jira issue tracker. Good documentation on site |
Following review of all products, Artifactory has all the criteria that we are looking for. Proximity Maven repository also seems to have most of the features we are looking for. We will look at implementing the Maven repository using Artifactory.
Other points about JFrog Artifactory are:
- Meets all our requirements
- Apache 2.0 license
- Runs on JDK 1.6 and Tomcat 6. Artifactory is deployed as a ‘war’ file in Tomcat.
- Uses Derby DB to store artefacts. Data is stored in a published and well known format
- All artifacts can be bulk exported to local repository and then imported into some other repository so it is easy to move artifacts from one implementation to another. It also makes upgrades of Maven repository very easy
- Compliant with Java Content Repository standard (JSR-170).
- Uses Lucene as search engine. Repository is indexed and can be re-indexed
- UI done using Ajax
- Easy to customise the UI
- Uses Jira as an issue tracker
6. Setting up the local Maven repository server
Updated open source local Maven repository installation tutorials
The version of Artifactory this tutorial deals with beyond this point in the article is somewhat old. For an updated look at installing either Sonatype Nexus or JFrog Artifactory as your open source local Maven repository of choice, please look at the following two articles, both of which include video tutorials on installation, configuration and JAR file uploads:
- How to setup a JFrog Artifactory private Maven repository
- Getting started with the Sonatype Nexus internal Maven repo
 A local Maven repository's friends
6.1 Required Artifactory software
- Artifactory Maven repository (https://jfrog.com/open-source/)
- The latest installation of the JDK
6.2 Artifactory directory structure
Down load and unzip artifactory. The directory structure is shown below:
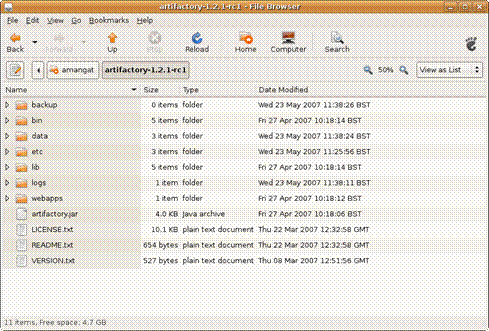
The folders are:
- Backup – backup of repository. Backup policy can be setup using ‘cron’ expressions. Quartz scheduler is used to run the backup at the specified time. The backup interval is specified in the ‘ARTIFACTORY_INSTALLATION
_FOLDER>/etc/artifactory .config.xml’ - Bin – batch files used to run the included jetty web server
- Data – Has derby database files. Everything in this folder can be deleted if you wish to start with a clean repository. In a new installation of artifactory, this folder is empty.
- Etc – Configuration files for artifactory. Has ‘artifactory.config.xml’ and ‘jetty.xml ‘and ‘log4j.,properties’
- Lib – has all the dependent jar files
- Logs – log files
- Webapps – has the ‘war’ file. This can be copied and installed in tomcat.
6.2 Deploy JFrog Artifactory in Tomcat
Deploy the ‘war’ file in ‘<ARTIFACTORY_INSTALLATION
Once the web applications is deployed, the web application needs this information:
- Location of the database to store the artefacts
- Location of the artifactory config xml file
- Location of backup folder
A single configuration is used to specify all 3. We only have to specify the location of the location of the artifactory installation folder during Tomcat startup and artifactory will be able to work out the rest. An alternative to this approach would have been to setup connection to the derby database using jdbc and to configure artifactory in the web application(by including artifactory.config.xml in the web application). However, this approach is simpler.
The location of artifactory installation folder can be specified as a environment variable. For Linux, use ‘.bash’ script to export the location of the artifactory installation folder as shown below:
export JAVA_OPTS = -Dartifactory.home=/home/amangat/artifactory-1.2.1-rc1
For Windows, it can be added to Tomcat startup options as shown below:
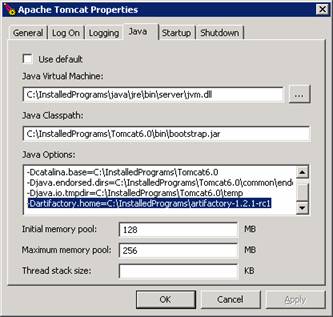
6.3 Setup the snapshot and release Maven repositories
A suggested approach is to create 3 repositories(or sub repositories) in our Maven repository. They are:
- Private-internal-repository: This repository contains artifacts which are used only within the organization. These are manually uploaded by the developer. This does not synchronize with remote repository with ibiblio as the artifacts in this repository(or sub-repository) are private to the organization.
- 3rd-party: This contains artifacts which are publicly available but not in ibiblio repository. Example could be latest versions of libraries which are not yet available on ibiblio or jdbc drivers. This repository is not synchronized with ibiblio as ibiblio does not have these jars
- Ibiblio-cache: This repository is synchronized with ibiblio repository and is a cache of the artifacts from ibiblio.
This is configured in the <ARTIFACTORY_INSTALLATION
<config xmlns:xsi="https://www.w3.org/2001/XMLSchema-instance"
        xmlns="http://artifactory.jfrog.org/xsd/1.0.0"
        xsi:schemaLocation="http://artifactory.jfrog.org/xsd/1.0.0
        http://www.jfrog.org/xsd/artifactory-v1_0_0.xsd">
    <!-- Backup every 12 hours -->
    <!--<backupCronExp>0 0 /12 * * ?</backupCronExp>-->
    <localRepositories>
      <localRepository>
          <key>private-internal-repository</key>
          <description>Private internal repository</description>
          <handleReleases>true</handleReleases>
          <handleSnapshots>true</handleSnapshots>
      </localRepository>
      <localRepository>
          <key>3rd-party</key>
          <description>3rd party jars added manually</description>
          <handleReleases>true</handleReleases>
          <handleSnapshots>false</handleSnapshots>
      </localRepository>
    </localRepositories>
    <remoteRepositories>
      <remoteRepository>
          <key>ibiblio</key>
          <handleReleases>true</handleReleases>
          <handleSnapshots>false</handleSnapshots>
          <excludesPattern>org/artifactory/**,org/jfrog/**</excludesPattern>
          <url>http://repo1.Maven.org/Maven2</url>
      </remoteRepository>
    </remoteRepositories>
</config>
Start Tomcat and navigate to http://localhost:8080/artifacto
The artifactory home page is shown below:
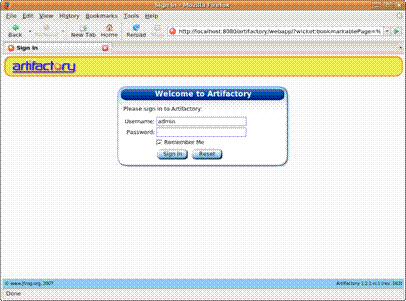
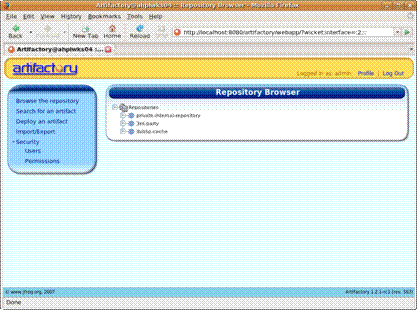
Sign in using username ‘admin’ and password ‘password’. Click on the Browse repository link and you should be able to view the contents of the repository.
7. Configuring Maven to use the new local repository server
7.1 Configure Maven using settings.xml
Maven uses the settings.xml file located at ‘~/.m2/settings.xml’ to get the location of Maven repository. If no repository is specified, Maven uses the default repository. The settings.xml file has to be changed to use the new repository. The settings are shown below:
<profiles>
      <profile>
            <id>dev</id>
            <properties>
                  <tomcat5x.home>C:/InstalledPrograms/apache-tomcat-5.5.20</tomcat5x.home>
            </properties>
            <repositories>
                  <repository>
                        <id>central</id>
                        <url>http://localhost:8080/artifactory/repo</url>
                        <snapshots>
                              <enabled>false</enabled>
                        </snapshots>
                  </repository>
                  <repository>
                        <id>snapshots</id>
                        <url>http://localhost:8080/artifactory/repo</url>
                        <releases>
                              <enabled>false</enabled>
                        </releases>
                  </repository>
            </repositories>
            <pluginRepositories>
                  <pluginRepository>
                        <id>central</id>
                        <url>http://localhost:8080/artifactory/repo</url>
                        <snapshots>
                              <enabled>false</enabled>
                        </snapshots>
                  </pluginRepository>
                  <pluginRepository>
                        <id>snapshots</id>
                        <url>http://localhost:8080/artifactory/repo</url>
                        <releases>
                              <enabled>false</enabled>
                        </releases>
                  </pluginRepository>
            </pluginRepositories>
      </profile>
</profiles>
7.2 Configure Maven using project ‘pom.xml’
The repository settings can also be done in the project pom.xml. A simple ‘pom.xml’ is shown below:
<project xmlns="http://Maven.apache.org/POM/4.0.0"
xmlns:xsi="https://www.w3.org/2001/XMLSchema-instance"
xsi:schemaLocation="http://Maven.apache.org/POM/4.0.0
http://Maven.apache.org/Maven-v4_0_0.xsd">
<modelVersion>4.0.0</modelVersion>
<groupId>test</groupId>
<artifactId>test</artifactId>
<packaging>jar</packaging>
<version>1.0-SNAPSHOT</version>
<name>test</name>
<url>http://Maven.apache.org</url>
       <repositories>
                      <repository>
                              <id>central</id>
                      <url>http://localhost:8080/artifactory/repo</url>
                      <snapshots>
                              <enabled>false</enabled>
                      </snapshots>
              </repository>
              <repository>
                      <id>snapshots</id>
                      <url>http://localhost:8080/artifactory/repo</url>
                      <releases>
                              <enabled>false</enabled>
                      </releases>
              </repository>
      </repositories>
      <pluginRepositories>
              <pluginRepository>
                      <id>central</id>
                      <url>http://localhost:8080/artifactory/repo</url>
                      <snapshots>
                              <enabled>false</enabled>
                      </snapshots>
              </pluginRepository>
              <pluginRepository>
                      <id>snapshots</id>
                      <url>http://localhost:8080/artifactory/repo</url>
                      <releases>
                              <enabled>false</enabled>
                      </releases>
              </pluginRepository>
      </pluginRepositories>
<dependencies>
   <dependency>
     <groupId>junit</groupId>
     <artifactId>junit</artifactId>
     <version>3.8.1</version>
     <scope>test</scope>
   </dependency>
</dependencies>
</project>
7.3 How to create a local maven repository server
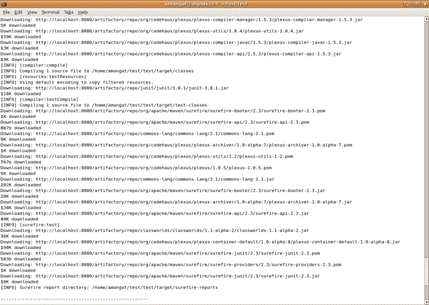
When building the Maven project, all the repositories should be downloaded using the new repository. The console will show the server Maven uses as shown below:
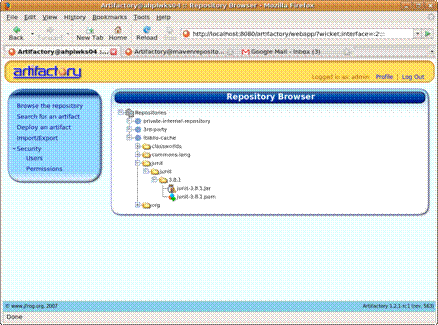
Login to the new repository using your web browser and you will see that artifactory has downloaded and cached the artifacts from ibiblio.
7.4 Local maven repository server setup complete
Artifacts can be installed using the web UI or using Maven command line. Installation using the web UI is simple and faster and does not require any configuration changes. Installation using the command line requires configuration changes in settings.xml and the it can be used in other scripts.
7.4.1 Installing artifacts using the web UI
The steps involved are shown below:
- Upload the artifact to deploy (‘jar’ file or ‘pom’ file)
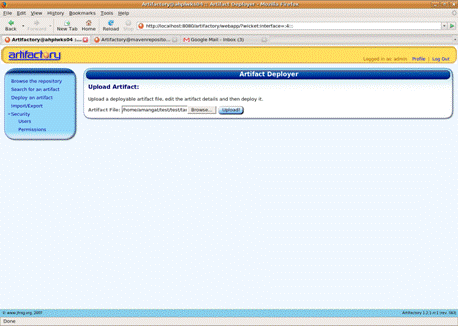
- Artifactory will create the pom file if you are uploading a jar file. You can also specify which repository to upload to.
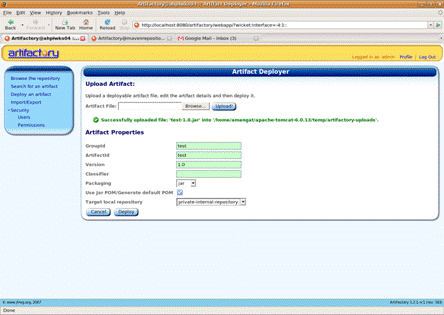
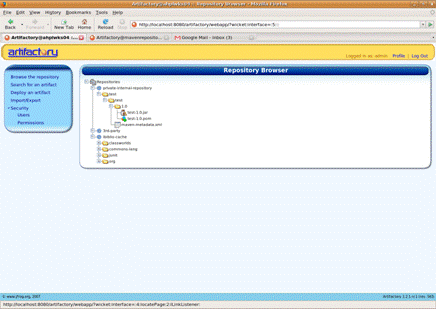
- Once uploaded, the artifact appears in the repository along with the ‘pom’ file created by artifactory.
7.4.1 Installing artifacts from Maven command line
When using ‘mvn clean install’ command, Maven only packages and installs the artifact to the local repository. To install it to the AHP internal repository, we have to add an additional configuration section in the settings.xml. The steps involved are shown below:
<settings>
      <servers>
            <server>
                  <id>organisation-internal</id>
                  <username>admin</username>
                  <password>password</password>
            </server>
      </servers>
</settings>
To install anartifactto internal Maven repository, the command is:
mvn deploy:deploy-file -DrepositoryId=organisation-internal -Durl=http://localhost:8080/artifactory/private-internal-repository
-DgroupId=test -DartifactId=test -Dversion=1.1 -Dpackaging=jar -Dfile=target/test-1.1.jar
The repository id should match the server id defined in the settings.xml. The url should include the name of the repository theartifactis to be installed in.
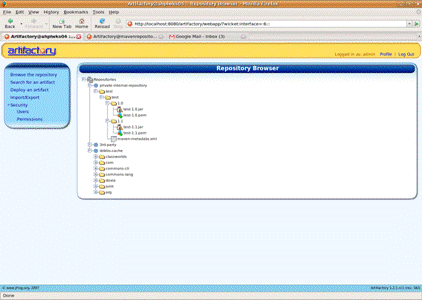
The new artifact appears in the repository and artifactory has created the ‘pom’ file for us automatically.
8. Other features of Artifactory Maven repository
8.1 How to backup a Maven repository
Backup policy is specified in the <ARTIFACTORY_INSTALLATION
<config xmlns:xsi="https://www.w3.org/2001/XMLSchema-instance"
        xmlns="http://artifactory.jfrog.org/xsd/1.0.0"
        xsi:schemaLocation="http://artifactory.jfrog.org/xsd/1.0.0
        http://www.jfrog.org/xsd/artifactory-v1_0_0.xsd">
    <!-- Backup every 12 hours -->
    <backupCronExp>0 0 /12 * * ?</backupCronExp>
    <localRepositories>
      <localRepository>
          <key>private-internal-repository</key>
          <description>Private internal repository</description>
          <handleReleases>true</handleReleases>
          <handleSnapshots>true</handleSnapshots>
      </localRepository>
      <localRepository>
          <key>3rd-party</key>
          <description>3rd party jars added manually</description>
          <handleReleases>true</handleReleases>
          <handleSnapshots>false</handleSnapshots>
      </localRepository>
    </localRepositories>
    <remoteRepositories>
      <remoteRepository>
          <key>ibiblio</key>
          <handleReleases>true</handleReleases>
          <handleSnapshots>false</handleSnapshots>
          <excludesPattern>org/artifactory/**,org/jfrog/**</excludesPattern>
          <url>http://repo1.Maven.org/Maven2</url>
      </remoteRepository>
    </remoteRepositories>
</config>
Backups are stored in ‘<ARTIFACTORY_INSTALLATION
8.2 Other local Maven repository features
- Delete artifacts using the web UI
- Search for artifacts using the web UI
- Bulk import/export all artifacts in repository
- The included jetty web server can be used if tomcat is not required
9. How to setup a local Maven repository conclusion
An internal private local Maven repository speeds up the build process and makes it easier to do clean builds. It also helps to avoid conflicts due to different versions of libraries.
Amongst the 4 common local Maven repositories available, JFrog Artifactory seems to be the better product.
Artifactory makes it easy to setup a local Maven repository server. It provides all the features which a good Maven repository should implement. The organization will not be locked into this tool as it is easy to migrate the repository contents to another implementation. A web UI makes the repository easy to use even for people who don’t know how the repository works.


