Spring Boot file upload example
In this Spring Boot file upload example you’ll learn how easy it is to move a file on the client’s machine to a folder on the server — all asynchronously — and with a minimal amount of code.
How to upload a file with Spring
Follow these five steps to use Spring to upload files from the client to the server:
- Create a Spring Boot application and include the Spring Web facilities;
- Create a Spring @Controller class;
- Add a method to the controller class which takes Spring’s MultipartFile as an argument;
- Save the uploaded file to a directory on the server; and
- Send a response code to the client indicating the Spring file upload was successful.
Spring MVC file upload controller
Developers should use the following code for the controller class, which handles the Spring file upload:
package com.example.demo;

import java.io.File;
import org.springframework.http.*;
import org.springframework.stereotype.Controller;
import org.springframework.web.bind.annotation.*;
import org.springframework.web.multipart.MultipartFile;

@Controller
public class SpringFileUploadController {

  @PostMapping("/upload")
  public ResponseEntity<?> handleFileUpload( @RequestParam("file") MultipartFile file ) {

    String fileName = file.getOriginalFilename();
    try {
      file.transferTo( new File("C:\\upload\\" + fileName));
    } catch (Exception e) {
      return ResponseEntity.status(HttpStatus.INTERNAL_SERVER_ERROR).build();
    }
    return ResponseEntity.ok("File uploaded successfully.");
  }

}
The controller code assumes an Ajax-based invocation, so only status codes are returned to the browser. This simplifies the Spring MVC code, which means we don’t have to deal with forwards or results pages. We have one Spring Boot file upload controller on the server, and one Ajax-based HTML5 file uploader on the client.
| More file upload options |
|---|
| I put together a bunch of file upload tutorials. Pick your technology and get uploading!
Uploading files to the server need not be a problem. |
Ajax and Spring file uploader
The easiest way to add file upload functionality to a web page is to use the HTML5 file input tags. A developer triggers the form submission through an Ajax call, which eliminates the need to wrap the HTML5 file input field with form tags. That also introduces a few extra lines of JavaScript code, but the payoffs — user friendliness, and no need to create any other HTML pages — are worth it.
Developers should save the following code to a file named uploader.html in the templates directory of the Spring Boot file upload example project.
<html xmlns:th="http://www.thymeleaf.org">
<head>
<title> Ajax Spring File Upload Example </title>
</head>
<body>

<!-- HTML5 Input Form Elements -->
<input id="fileupload" type="file" name="fileupload" />
<button id="upload-button" onclick="uploadFile()"> Upload </button>

<!-- Ajax JavaScript File Upload to Spring Boot Logic -->
<script>
async function uploadFile() {
  let formData = new FormData();
  formData.append("file", fileupload.files[0]);
  let response = await fetch('/upload', {
    method: "POST",
    body: formData
  });

  if (response.status == 200) {
    alert("File successfully uploaded.");
  }
}
</script>

</body>
</html>
Run the Spring MVC file uploader
With the Spring controller coded in Java and the HTML file saved to the templates directory, a developer can deploy and test the application. When the application runs, the URL to bring up the HTML5 file upload form in the browser is:
http://localhost:8080/index
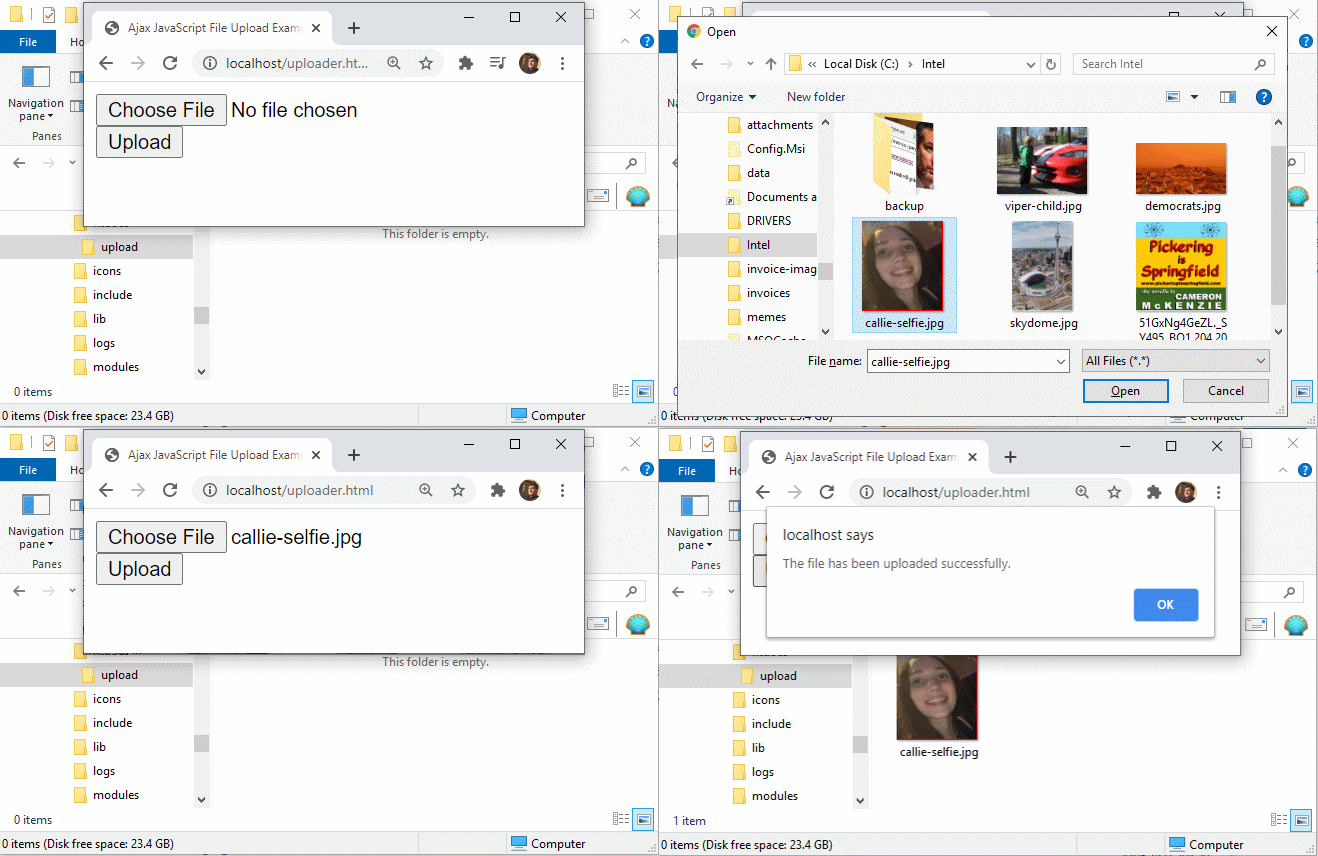
The result is an Ajax-based, Java Spring Boot file upload that persistently saves files uploaded to the server from the client’s browser.

The Spring Boot file upload controller will persistently save images and other files sent to the server from a the client’s browser.
The source code for this Spring file upload example is available GitHub.
Cameron McKenzie is an AWS Certified AI Practitioner, Machine Learning Engineer, Solutions Architect and author of many popular books in the software development and Cloud Computing space. His growing YouTube channel training devs in Java, Spring, AI and ML has well over 30,000 subscribers.
Cameron McKenzie is an AWS Certified AI Practitioner, Machine Learning Engineer, Solutions Architect and author of many popular books in the software development and Cloud Computing space. His growing YouTube channel training devs in Java, Spring, AI and ML has well over 30,000 subscribers.


